Exchange Online Protection (EOP) is the cloud-based filtering service that helps protect your organization against spam and malware. EOP is included in all Microsoft 365 organizations with Exchange Online mailboxes. EOP is also available in some on prem scenarios. Exchange Online Protection is already available with Exchange Online.
In this guide, we will go through some simple, yet effective, configurations. Each configuration should be quick and easy to complete. However, it does depend on your organization and it’s users/data.
Overview
- Mai Flow with EOP
- Configure a connection filter
- Configure anti-malware policy with notifications
- Configure a mail flow rule
- Configure anti-spam policy with periodic notifications
- Configure DKIM for custom domains
- Next steps
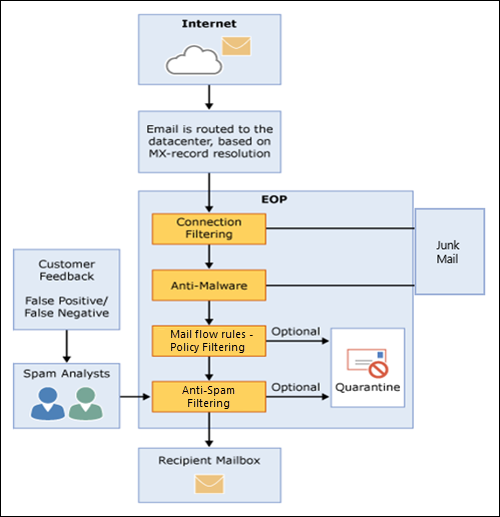
Mail Flow with EOP
Exchange Online follows the below flow when delivering email to your end users. Each process is a threat management filter/policy.
Configure a Connection Filter
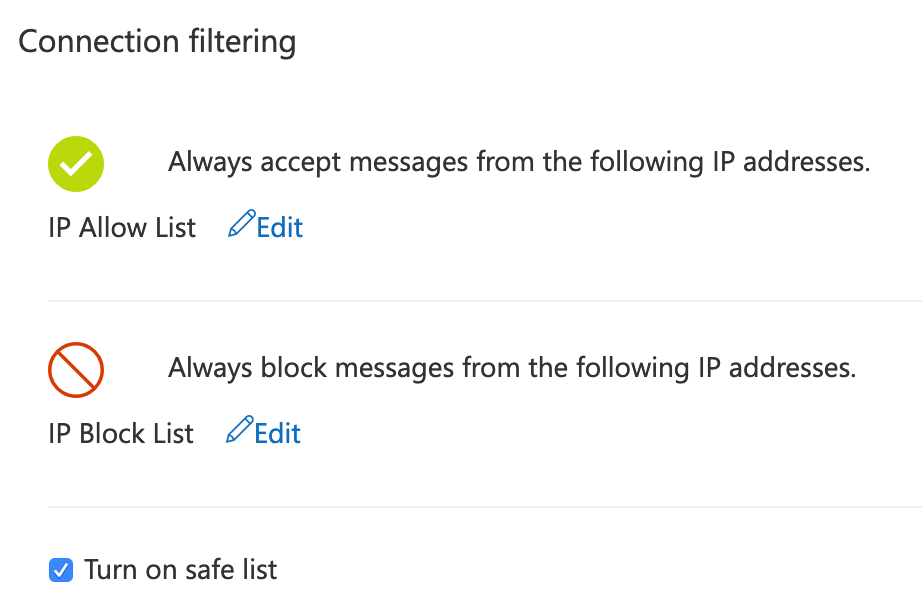
The key components of connection filter policies are IP Allow and Block lists. You may want to block a known IP address that sends you spam email, or alternatively, allow a location that you know is legitimate. Microsoft also have a safe list in their data centers of vendors they trust. You cannot see or edit this list. It only recommended to safe list IP’s you 100% trust.
- Go to the Microsoft 365 Security & Compliance Center>Threat Management>Policy>Anti-Spam>Connection Filter Policy
- Click Edit Policy
- Add any IP addresses you wish to allow or block.
- Enable Safe List and save.
Configure Anti-malware Policy with Notifications
By default, EOP will be attempting to prevent malware getting to users’ inboxes. Malware is viruses and spyware. Viruses infect other programs and data, and they spread throughout your computer looking for programs to infect. Spyware is a specific type of malware that gathers your personal information (for example, sign-in information and personal data) and sends it back to the malware author.
By customizing your anti-malware policy, you can be more strict on what gets through and who gets notified.
In this example, I will configure a new policy that will
- Email recipients when malware was detected and email quarantined (from malware policy)
- Enable to common attachments option for detecting common file extensions associated with malware
- Enable Malware Zero-hour Auto Purge which will quarantine malware even if detected after delivery
- Notify internal senders if one of their messages has malware detected in within an email
- Enable admin notifications for any malware detection and send them to the security team (recommend at least internal notifications)
- Customize the notifications to personalize it for end users
- Apply it to all users within a domain
To configure an anti-malware policy, go to Microsoft 365 Security & Compliance Center>Threat Management>Policy>Anti-malware>Add
When you have configured your settings accordingly, select the scope you want to assign it too. For my example, I assigned it to all domains in the tenant.
Configure a Mail Flow Rule
You can use mail flow rules (also known as transport rules) to identify and take action on messages that flow through your Exchange Online organization. Mail flow rules are similar to the Inbox rules that are available in Outlook and Outlook on the web. The main difference is mail flow rules take action on messages while they’re in transit, and not after the message is delivered to the mailbox.
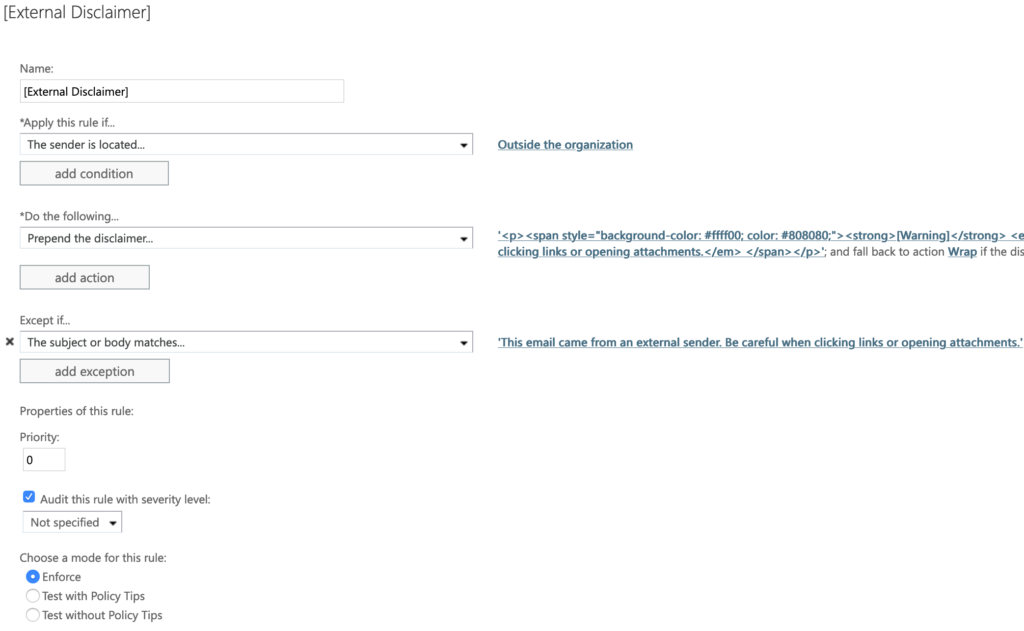
This allows you to take actions based on a set of conditions defined. In my example, I will be prepending a HTML header to all emails To: Anyone and From: Any sender outside my domain. Except if the prepended header already exists within the email thread (as I assume the user has replied, and the external replied to that reply. My disclaimer will look like the following. (This was generated on from an online HTML editor).
[Warning] This email came from an external sender. Be careful when clicking links or opening attachments.
To create a mail flow rule, go to the Exchange Admin Center>Mail Flow>Rules>Add. Click on the more options button to see advanced options. My rule contains the following conditions.
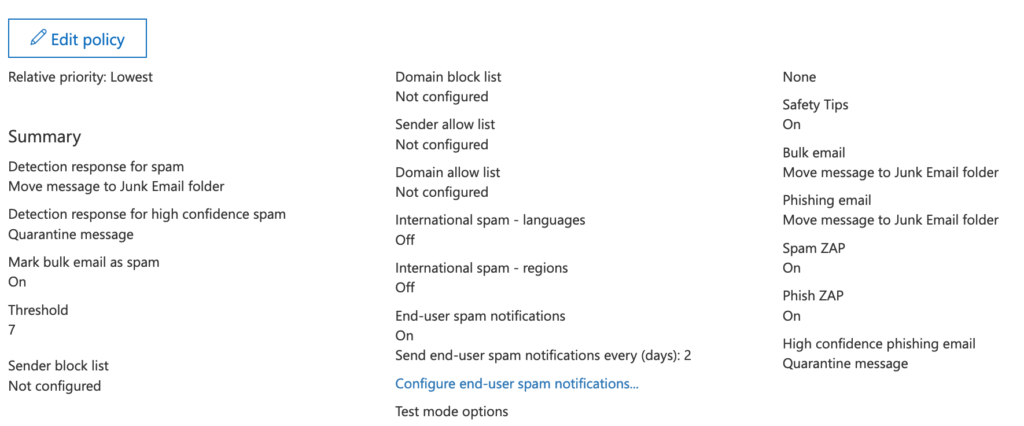
Configure Anti-spam Policy with Periodic Notifications
Spam is unsolicited and unwanted email. Anti-spam policies help filter out spam. There are a lot of options for the Anti-spam policies. You can create policies and apply them to different sets of users. Here you can:
- Allow / block list domains
- Allow / block list senders
- Set how spam is treated (I.e. Quarantine or Junk)
- Configure periodic notifications for end users so they don’t miss any false positive “spam”
- Set international filters based on language/Countries
- More
In my example, I want to quarantine high confidence spam and send users email notifications every two days if they have any quarantined messages.
Create an Outbound Spam Policy
Outbound spam from a user in your organization typically indicates a compromised account. Suspicious outbound messages are marked as spam (regardless of the spam confidence level or SCL) and are routed through the high-risk delivery pool to help protect the reputation of the service (that is, keep Microsoft 365 source email servers off of IP block lists). It is recommended to set limits on outbound mail.
Configure DKIM for Custom Domains
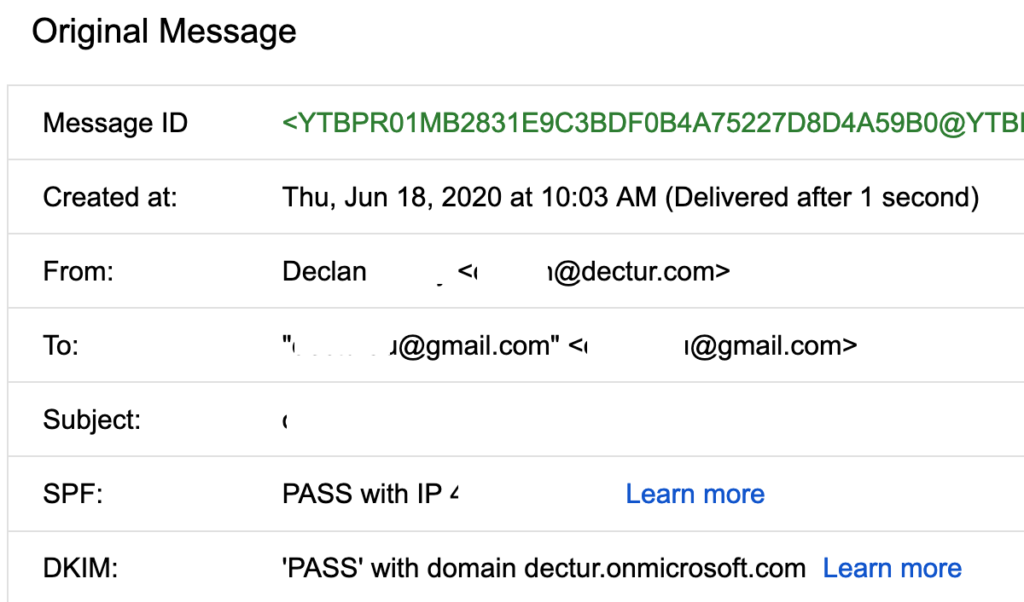
SPF adds information to a message envelope but DKIM actually encrypts a signature within the message header. When you forward a message, portions of that message’s envelope can be stripped away by the forwarding server. Since the digital signature stays with the email message because it’s part of the email header, DKIM works even when a message has been forwarded.
Microsoft already have DKIM enabled for the .onmicrosoft domain in your tenant. If you send an email from a custom domain, it will be DKIM signed with the .onmicrosoft.com. As shown below.
To enable DKIM
- Connect to Exchange Online PowerShell
- Run the followings commands for each domain you wish to enable DKIM on
New-DkimSigningConfig -DomainName <domain> -Enabled $false
Get-DkimSigningConfig -Identity <domain> | Format-List Selector1CNAME, Selector2CNAME- You will then create 2 CNAME records for each domain, using the Selector1CNAME and Selector2CNAME you extracted from PowerShell. The CNAME should be in the format:
| Host name | Points to |
selector1._domainkey | Selector1CNAME |
selector2._domainkey | Selector2CNAME |
- Go to DKIM inspector here and check your domain for Selector1 and Selector2.
- Go to the Security and Compliance Center>Threat Management>Policy>DKIM
- Highlight your domain and click Enable. If the option you have is ‘Disable’ then DKIM is enabled for that domain.

- Once enabled, test mail flow again. It will now be signed with your custom domain.

Next Steps
This guide was to cover the simple and quick configurations you can do to improve your security posture. There are many advanced and more time consuming configurations you can implement. Some of them depend on your environment and each org can be different. Some examples are:
- Domain-based Message Authentication, Reporting & Conformance (DMARC) for further email authentication.
- Advanced Threat Protection for M365 which includes ATP Anti-Phishing, ATP safe attachments and ATP Safe links (Now known as Microsoft Defender for M365)
- Data loss prevention policies
- Retention tags and policies
- Review Microsoft recommended settings for Exchange Online Protection and Microsoft Defender for M365.