Microsoft announced support for RDS environments to be published via the Azure AD Application Proxy. You can read the announcement here.
Why Use RDS with Azure AD App Proxy?
RDS allows you to extend virtual desktops and applications to any device while helping keep critical intellectual property secure. By using App Proxy with RDS you can reduce the attack surface of your RDS deployment by enforcing pre-authentication and Conditional Access policies like requiring Multi-Factor Authentication (MFA) or using a compliant device before users can access RDS. App Proxy also doesn’t require you to open inbound connections through your firewall.
Overview
At first glance, I was happy to see a document which I thought looked very simple. However, during testing it, I ran into several issues such as:
- ‘Single Sign-On’ from RDWeb to the Gateway
- Firewall authentication issue after changing the collection configuration
- Server unavailable
I spent some time reading a lot of blogs and articles where others had the same issue. For the most part, people were suggesting to add a secondary Enterprise Application for the RD Gateway with /RPC extension. This turned out to be incorrect. In my case, it seemed to be certificates causing these issues, so I went and bought one for less than $4 with Name Cheap.
In this blog, I want to walk through the following:
- The RDS infrastructure setup and configuration (Basic setup)
- RDS Web Client configuration
- The Azure AD Proxy Connector and associated Enterprise Application
- Accessing your resources
What you need to Start
This is what I ended up using which would have been easier to know before implementing.
- An Azure AD subscription that includes Azure AD App Proxy (P1 or P2)
- A Domain to join servers too
- 2 or more newly built Servers for RDS (In my case I am putting all roles on one server. It is recommended to split them across multiple servers. NOTE: This blog does not cover licensing. Ensure you have the correct licensing for RDS. Other servers are for App Proxy connector, AD, etc.)
- Decide if you want to use a private or public domain. In my case. I will use a custom domain. I will need to add a CNAME record. I used rds.domain.com in my example.
- If you want to use a custom domain, it should be accepted in AAD
- Buy a certificate for your chosen domain. I will talk about generating a Certificate Signing Request from IIS later in this blog.
Building RDS Server
On your newly built server, which is joined to a domain, we will add the roles for RD Connection Broker, RD Web Access, RD Session Host & RD Gateway.
- Open Server Manager
- Click Manage then Add/Remove Roles and Features
- Under Installation Type select Remote Desktop Services Installation
- Under Deployment Type select Standard Deployment
- Under Deployment Scenario select Session-based Desktop deployment
- Click Next under Role Services
- Under RD Connection Broker, highlight your new server from the pool and click the arrow to add it to ‘Selected’. Then click Next.
- Under RD Web Access do the same as above and click Next.
- Under RD Session Host do the same as above and click Next.
- Under Confirmation select the restart automatically option and click Deploy.
Confirm the roles have installed on this server. Then:
- From Server Manager go to Remote Desktop Services then Overview
- Under Deployment Overview, Click the Green + for RD Gateway to add an RD Gateway server
- Click the arrow to add your RDS server and click Next
- For the SSL Certificate Name, use the name you decided at the start. In my case, I am using rds.dectur.com.
- I am using a public URL which will be made available later
- Later, I will purchase a certificate for this URL
- This certificate will be used for all services
- If you do not want to use a public URL, this will be changed to your app proxy URL. I will remind you later about this.
- When entered, click Next then Add.
Install Azure AD App Proxy
For Azure AD App Proxy on Server 2019, there are some recommended registry tweaks. Below are provided by Microsoft. Save them as a .reg file and import them to your proxy connector server. You need to ensure this server has an outbound connection.
The first is for Http2. Save as .reg and import. Confirm they applied through Regedit.
Windows Registry Editor Version 5.00

[HKEY_LOCAL_MACHINE\SOFTWARE\Microsoft\Windows\CurrentVersion\Internet Settings\WinHttp] "EnableDefaultHttp2"=dword:00000000
Next is for TLS. Save as .reg and import. Confirm they applied through Regedit.
Windows Registry Editor Version 5.00

[HKEY_LOCAL_MACHINE\SYSTEM\CurrentControlSet\Control\SecurityProviders\SCHANNEL\Protocols\TLS 1.2]
[HKEY_LOCAL_MACHINE\SYSTEM\CurrentControlSet\Control\SecurityProviders\SCHANNEL\Protocols\TLS 1.2\Client]
"DisabledByDefault"=dword:00000000
"Enabled"=dword:00000001
[HKEY_LOCAL_MACHINE\SYSTEM\CurrentControlSet\Control\SecurityProviders\SCHANNEL\Protocols\TLS 1.2\Server]
"DisabledByDefault"=dword:00000000
"Enabled"=dword:00000001
[HKEY_LOCAL_MACHINE\SOFTWARE\Microsoft\.NETFramework\v4.0.30319]
"SchUseStrongCrypto"=dword:00000001
Next, we install the App Proxy Connector
- Sign in to the Azure portal
- In the left navigation panel, select Azure Active Directory.
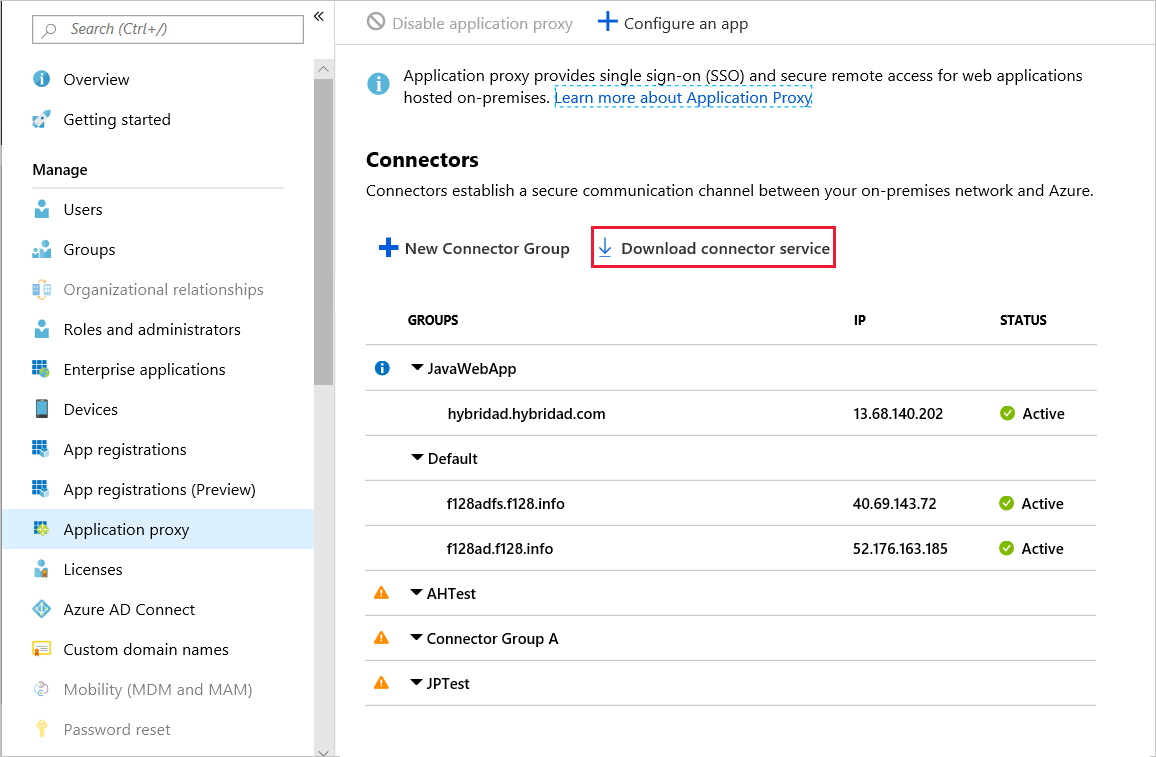
- Under Manage, select Application proxy.
- Select Download connector service.
- Click Accept terms & Download.
- Select Run
- Follow the instructions in the wizard to install the service. When you’re prompted to register the connector with the Application Proxy for your Azure AD tenant, provide your application administrator credentials.
Refresh the Azure AD page and confirm it has installed and is active.
Configure the Enterprise Application for your RDS Server
- Under Azure Active Directory>Application Proxy click on +Configure an App
- Name: A Friendly name. This is what users will see from myapplications.microsoft.com
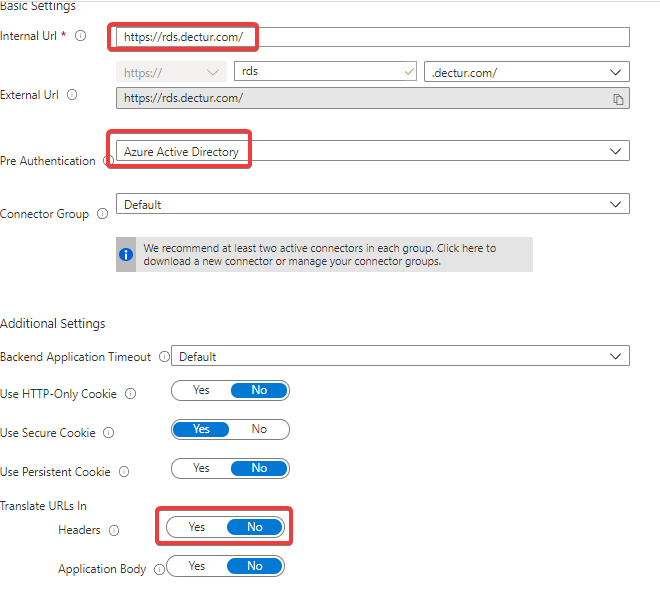
- Internal URL: The root of your RDS server (Not RdWeb, or RPC). I.e. https://rds.dectur.com/
- Ensure you have the trailing slash
- This URL must be DNS resolvable from the AD Proxy server
- External URL: Leave as is. Copy somewhere convenient.
- Pre-Authentication: Azure Active Directory
- Translate URLs in
- Headers: No
- Leave other settings default
- Click Save
- Under Users and Groups assign users to the new app.
Option 1: Third-Party Certificate for a Custom Domain ( I.e. rds.domain.com)
In my example, I am using a public URL (Not available on the web. No port forwarding is required). I need to first choose an SSL provider. In my case, I went with Name Cheap. You will most likely need a CSR to get the certificate.
To generate the signing request:
- Open IIS
- Click the Server and double click Server Certificates
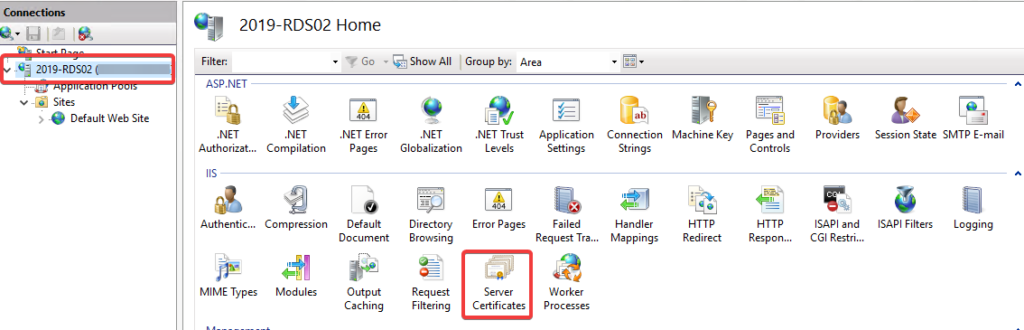
- Click Create Certificate Request on the right-hand side
- Fill out the details with your public URL in the common name. I.e. I will use rds.dectur.com.
- If you get stuck with this, you can contact the provider of your certificate for more info.
- When complete, it will save as a txt file. Open that file and copy the contents to the CSR field when issuing the certificate.
- Go and obtain your SSL cert from your provider and download it
- Go back to IIS>Server>Server Certificates and click Complete Certificate Request and upload the certificate.
When done, you need to update your Azure AD Application (if you want to use a custom domain).
- Under AAD>Enterprise Applications, find your new app and click on it.
- Go to Application Proxy
- Change the External URL to your preferred URL/Domain.
- Click Upload Certificate and upload the .pfx certificate you previously exported.
- Go and add the CNAME record provided in this section to your public domain.
Option 2: Internal Certificate Authority (ADCS)
If you have an internal Certificate Authority, you can request a certificate from your CA. I used a template which allowed me to define the subject information on request. Ideally, your root CA certificate is installed on the sevrer. You should have a template created and published. Your RDS server should have read and enroll permissions on the Security tab of the template.
- On your RDS Server, open mmc.msc
- Click File>Add/Remove Snap-In and select Certificates for the Local Machine.
- Expand Personal>Certificates
- Right-click Certificates and select Request a Certificate
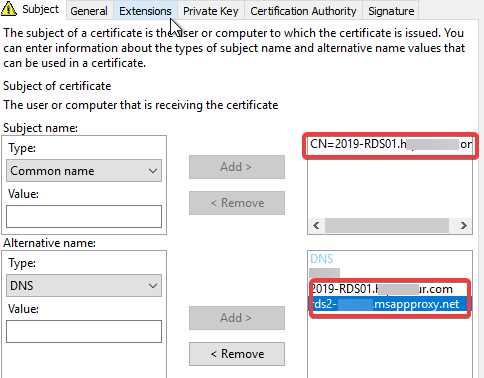
- Select your template you wish to use and fill out the information as follows. Note: there are more than one DNS. Click the arrow to add each one.
- Common Name: Internal FQDN. E.g. RDS02.ad.domain.com
- DNS: Internal hostname. E.g. RDS02.
- DNS: Proxy address of your AAD App. E.g. <domain>.msappproxy.net
- Continue through the steps and enroll.
Option 3: Self-Signed Certificate
To use a self-signed certificate, you can use this PowerShell code to generate. Run this on your RDS Server and replace the $Proxy Variable with your Applications Proxy address.
$Hostname = (Get-WmiObject win32_computersystem).DNSHostName
$Domain = (Get-WmiObject win32_computersystem).Domain
$FQDN = $Hostname+"."+$Domain
$Proxy = '<domain>.msappproxy.net'

New-SelfsignedCertificate -Subject "CN=$FQDN" -DNSName "$Proxy", "$Hostname" -FriendlyName "$FQDN for RDS" -CertStoreLocation 'cert:\LocalMachine\My' -KeyLength 2048 -KeyAlgorithm  'RSA'
Export the Certificate (Required for all Options)
As I will use the certificate for all services, I want to export it.
- Click Win + R and enter mmc then press enter to open the management console
- Click File>Add/Remove Snap-in and add Certificates for the Computer Account
- Expand Certificates>Personal>Certificates
- Locate your new certificate, right-click and select All Tasks>Export
- Export the certificate with the private key as .pfx. Set a password on the export and save it somewhere convenient.
- Go back and export it again, this time without the key and as a base 64 .cer file. Save this somewhere convenient. You will need this to enable the RD Web Client.
Edit Deployment Properties & Bind Certificates
The fist place we will bind the certificate to is IIS. To do this:
- Go to IIS>Sites>Default Website and click Bindings on the right-hand side
- Under HTTPS/443, bind your public certificate which you imported to IIS previously
- Apply it and then run iisreset
The next place we want to bind the certificate to is the RD services (Connection Broker, Web Access & Gateway).
- Open Server Manager>Remote Desktop Services>Overview
- Under Deployment Overview click Tasks and select Edit Deployment Properties
- Under the RD Gateway tab, ensure your public URL is set (or your app proxy domain. Remember, these are the same – if you have a custom domain, it points to the proxy URL anyway). Also ensure the logon method is set to Password, and that only the top checkbox is selected for using RD Gateway credentials. My URL will be rds.dectur.com. If you are not using a custom domain, it will be domain.mrsproxy.net. Apply any changes made.
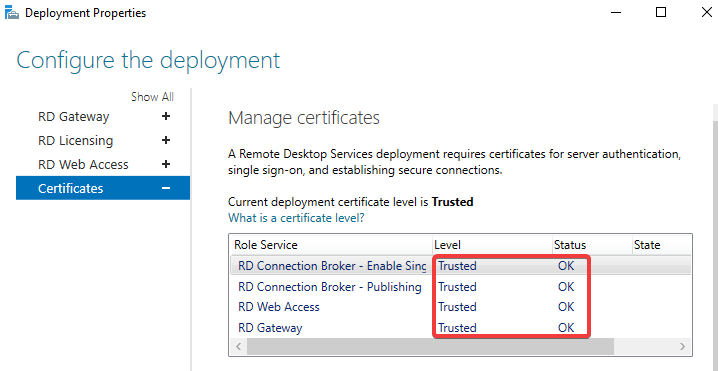
- Under the Certificates tab, highlight the first service and click Select Existing Certificate
- Browse to the .pfx you exported earlier, enter the password you set and check the checkbox. Click OK then Apply.
- Repeat this for all services until they all have your certificate.
Install the RD Web Client
The Remote Desktop web client lets users access your organization’s Remote Desktop infrastructure through a compatible web browser.
Run the following commands. Replace <.cer file path> with the location of the .cer you previously exported.
Install-Module -Name PowerShellGet -ForceRestart your PowerShell session after running the command above. Then run the below commands one by one.
Install-Module -Name RDWebClientManagement
Install-RDWebClientPackage
Import-RDWebClientBrokerCert <.cer file path>
Publish-RDWebClientPackage -Type Production -Latest
Change Home URL for your Application
When we configured the Azure AD App, it was configured with the root URL of your RDS server. This needs to stay this way. However, when users are accessing from myapplications.microsoft.com, we don’t want them to see an IIS Web Page.
In my case, I want the Web Client to load as the home page (rather than RDWeb).
- Go to AAD>App Registrations (Not Enterprise Applications)
- Locate your app and click Branding
- Beside Homepage URL
- For Proxy URLs https://<domain>.msappproxy.net/RdWeb/WebClient
- For custom domains https://rds.domain.com/RdWeb/WebClient
Create & Configure a Collection
Now we want to publish Desktops and/or applications to our users.
- Open Server Manager on the RDS Server
- Go to Remote Desktop Services>Collections
- Click Tasks then Create Session Collection
- Go through the steps and publish the desktop or apps
Now we need to configure Single Sign-on from the RDWeb to the RD Gateway. If you are using a custom domain, run the following cmdlet against the collection.
Set-RDSessionCollectionConfiguration -CollectionName "CollectionName" -CustomRdpProperty "pre-authentication server address:s:https://rds.domain.com/`nrequire pre-authentication:i:1"If you are using the app proxy URL, you will run the same command with a different URL. You will get this URL from the Enterprise App.
Set-RDSessionCollectionConfiguration -CollectionName "Collection1" -CustomRdpProperty "pre-authentication server address:s:https://<domain>.msappproxy.net/`nrequire pre-authentication:i:1"
Access your Resources
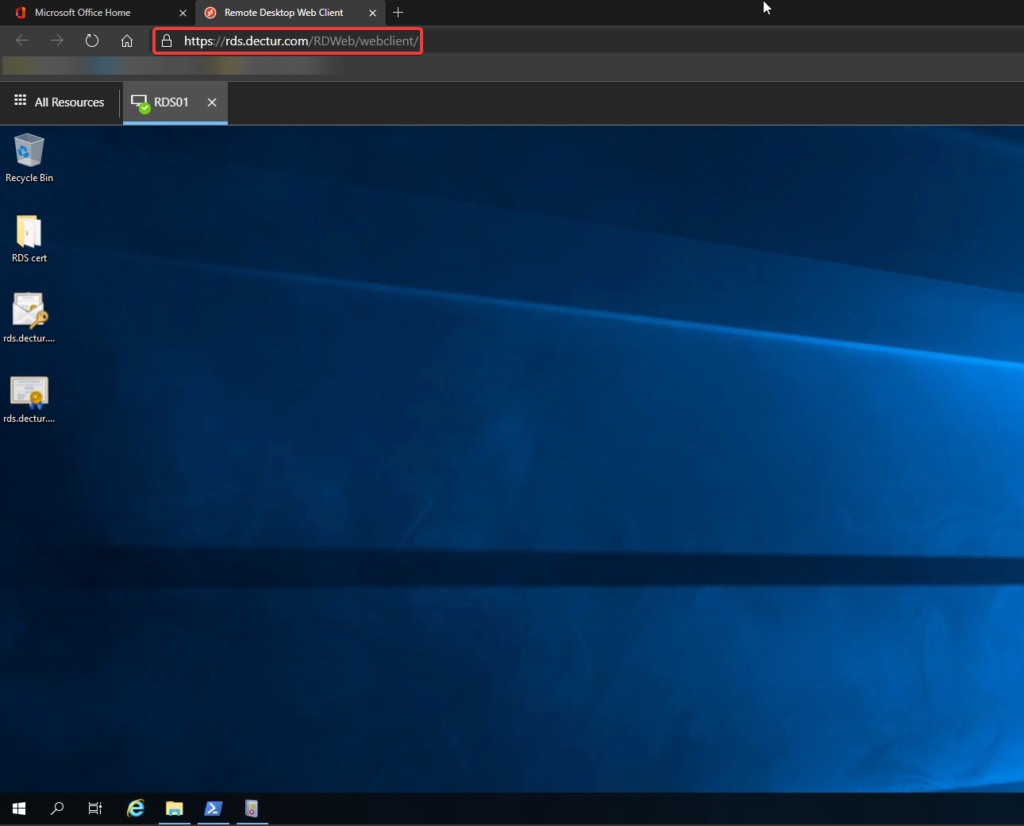
Go and login to https://myapplications.microsoft.com where you will see the application. Click on your app, and it will open the RDS Web Client. Sign in here, and then access your resources from the browser.
Below shows accessing a desktop with a custom domain.
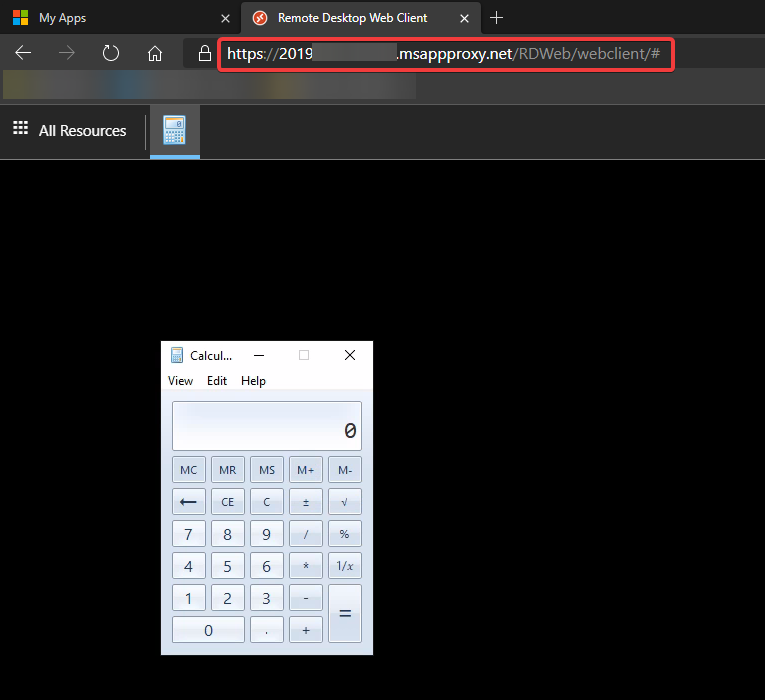
Below shows access to an application from the proxy URL
What Next?
- Add more session hosts to your deployment
- Make your RDS environment & App proxy connectors highly available
- Control access to RDS by creating Conditional Access policies